
Project Setup

This page describes content that may be included in a future update.
This content has appeared in v1.17.0 development versions, but the full update containing it has not been released yet.
_JE3_BE2.png)
This page describes an experimental feature.
This feature might behave unexpectedly.
The ore_ui_customizer folder
If you are on desktop (PC, Linux, or macOS), then you are probably using the app verison of the Ore UI Customizer. In that case, you can work on your themes easily without needing to re-import the theme each time you modify it, via the ore_ui_customizer folder, this folder is like Minecraft's com.mojang folder, but for the Ore UI Customizer.
You can easily open this folder by clicking Help > Open Customizer App Data Folder in the menu bar of the app.
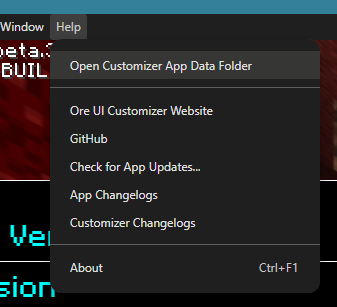
In that folder, go to the themes folder, you can put your theme in there and work on it from there.
Your Workspace
First of all, you will need to create the proper folders in suitable locations and set up your workspace. The remainder of this guide assumes you are using VSCode. You may also follow along with other editors.
Let's create your first add-on workspace in Visual Studio Code now.
- Open VSCode (Visual Studio Code, the code editor)
- Create a folder named "
your_theme_name" inthemes. We will refer to this folder astheme - Go to
File > Add folder to workspace...and choosetheme. - Press
File > Save Workspace as...to save the workspace file to your Desktop. Whenever you're working on your theme, all you have to do is open the workspace by double-clicking, and you will get quick access to your theme folder.
Manifest
CREATING FILES
In this guide, you will often be instructed to create files with specific names, placed in specific folders. If the folder doesn't exist yet, please create it!
The manifest is a file that identifies your pack to the Ore UI Customizer. Every pack has one manifest. A folder with a correctly formatted manifest will show up in the Ore UI Customizer, and we consider this the "minimal" pack before we can add additional content.
Manifest files are written in JSON. If this isn't familiar to you, you can learn more about json here.
First, create a new file in your theme folder by right-clicking on the folder and selecting New File Call the file manifest.json and paste the following code into the file to begin with.
{
    "$schema": "https://www.8crafter.com/schemas/ouic/theme/manifest.schema.json",
    "format_version": 1,
    "header": {
        "name": "Your Theme Name",
        "description": "Your theme description.",
        "uuid": "...",
        "version": "1.0.0",
        "format_version": "1.17.0",
        "min_engine_version": "1.17.0+BUILD.8"
    },
    "metadata": {
        "authors": ["Your Name"],
        "product_type": "theme"
    }
}Manifest Explained
format_versiondefines what version of manifest JSON format you are using. Version 1 is the most recent stable version; use it.nameis the name of your theme.descriptionwill show up under it in the Ore UI Customizer.
The
uuidfield is essential, and will be discussed in more detail below.versiondefines the version of your theme.This allows users to import updated versions of your add-on without encountering a "Duplicate pack detected" error. You don't need to change the version if you have the add-on in
development_*_packsfolders and only use them on private worlds.format_version(header) defines the Ore UI Customizer version that your theme was made for. The number specified here should match the latest version of the Ore UI Customizer that you tested it on.min_engine_versiondefines the minimum Ore UI Customizer version that'll be able to use your theme. The number specified here should match the current version of the Ore UI Customizer, unless you're planning for backwards compatibility with older versions, in which case you should specify the earliest version of the Ore UI Customizer that your theme is compatible with. You can omit this if you don't want to prevent older versions of the Ore UI Customizer from attempting to use it.In
metadata, theproduct_typemust be a product type of"theme".
UUID Explained
A UUID (Universally Unique Identifier) identifies your pack for other programs (in this case, the Ore UI Customizer) to read. It looks something like this: 5c830391-0937-44d6-9774-406de66b6984
NEVER USE THE SAME UUID TWICE. You can generate your own UUIDs here or, if you use VSCode, you can install this extension. Every manifest file has a UUID.
To ensure that your add-on will work correctly you should generate a new UUID which you will paste into the theme manifest.json file, at the "...". When you are finished, it should look something like this:
"uuid": "5c830391-0937-44d6-9774-406de66b6984"Pack Structure
Development Pack Stucture
- 📝ore-ui.css-data.json
- 📝settings.json
- 📝example.css
- 🖼️example.gif
- 🖼️example.gif
- 🖼️example.svg
- 🖼️example.png
- 🖼️example.jpg
- 🖼️example.jpeg
- 🖼️example.svg
- 🖼️example.png
- 🖼️example.jpg
- 🖼️example.jpeg
- 🎥example.webm
- 🎥example.webm
- 📑*.otf
- 📑*.ttf
- 📝color_replacements.json
- 📝manifest.json
- 🖼️pack_icon.png
- 📝.prettierrc
- 📝package.json
Publish Pack Stucture
- 📝example.css
- 🖼️example.gif
- 🖼️example.svg
- 🖼️example.png
- 🖼️example.jpg
- 🖼️example.jpeg
- 🖼️example.svg
- 🖼️example.png
- 🖼️example.jpg
- 🖼️example.jpeg
- 🎥example.webm
- 🎥example.webm
- 📑*.otf
- 📑*.ttf
- 📝color_replacements.json
- 📝manifest.json
- 🖼️pack_icon.png
Videos must be in the .webm format. The video codec of videos must be Google/On2's VP9 Video (VP90). The audio codec of videos must be Vorbis Audio (vorb) (and the max supported bitrate may be 112 kb/s, but this needs to be verified)
NOTE
Some of the contents of the Bedrock Wiki's Project Setup guide were used to help make this guide.